

One year later, following the Ender 3 V2, the Ender 3 family adds a new member: , as the upgraded version of Ender 3 V2, with $399 price tag, you will get a 220 x 220 x 270 mm build volume, a “Sprite" direct dual-gear extrusion system, a removable flexible PC spring steel print bed, an automatic bed leveling sensor, and some other improvements.
The upgraded Creality Ender 3 S1 Pro has been officially released, you can check more details here.
The Ender V2 received good scores in most reviews, it has some upgrades and creativity over the ender 3: a drawer for candies or tools, a new color display, and a silent motherboard, but from my personal view, these improvements do not impress me too much, even though it is one of the printers I like and recommend.
The , billed as an Ender 3 V2 upgrade, seems to me that it is more like a twin of the Ender CR-SE, although it has a spring steel printing platform and a proximal direct extruder, which is different from the Ender CR-SE.

Design & Features
Design:
According to the Creality team, in the name of Ender 3 S1, "S" comes from Creality’s newly developed extruder "Sprite". This new extruder is extruded with metal double gears and has an extrusion force of up to 80N (see the next part for a more detailed introduction).
At the first look, there is not too much difference in the design between Ender 3 S1 and Ender 3 V2, the Ender 3 S1 continues the same dual Z-axis design of the Ender 3 series, despite it has heavier weight and larger volume, but it is visually neater and more pleasant. When Ender V2 was released last year, it was considered as the best looking printer in the ender 3 series, but I think this time the ender 3 S1 may have taken that spot away from it, I am very happy with its exterior design.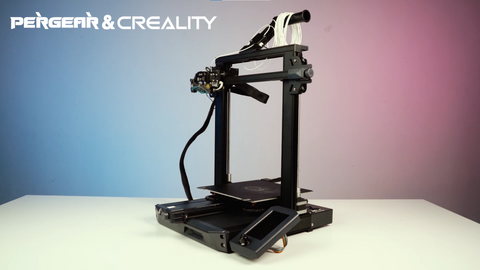
This time the Ender 3 S1 also retains the tool box where you can put tools and cookies, but the box is more hidden, you can see that the opening is a groove rather than a small round handle.
Key features:
-
Direct extruder
-
Filament Detection Sensor
-
Automatic Bed Leveling Sensor
-
32 bit board with ultra-silent drivers
-
High precision Dual-Z axis
-
Super Quick Arming
-
Very expandable. Modules for extra updates
-
Removable Flexible Spring Steel Bed
-
4.3 ″ Knob-Screen
-
X and Y Belt Tensioner
-
Toolbox
-
New more reinforced design
Now let's take a look at what's new and exciting in the ender 3 s1.
1. "Sprite" Direct drive extruder
The Ender 3 S1 adopts the “Sprite" direct dual-gear extruder , it is advertised by Creality that this extruder lighter in weight, features less inertia, and is more precise positioning compared with other direct extruders, and when you print flexible filaments such as TPU the results are excellent.![]()
The extruder is a very important part of a 3D printer as it transfers the heated printing material onto the print bed layer by layer. There are a large selection of direct drive extruders and Bowden extruders in the market. The Direct Extruder has more precise control of the loading amount than the Bowden Extruder, and the retraction is more precise. This results in a better surface on the printed model, and it is more likely to give us better results when we print the flexible filaments. But Bowden extrusion also has its advantages, its motor power is greater, the printing speed can be faster, and it is also more convenient to maintenance.
The direct drive extruder offers better extrusion and faster retraction. If you want to process flexible materials and require high quality prints, then direct drive extruder may be more suitable for you.
2. PC magnetic build plate
The printing platform of Ender 3 S1 is the PC magnetic build plate, a combination of a PC coating, a spring steel sheet and a magnetic sticker. It is much better than the old magnetic plate in Ender 3 PRO, it resists higher temperatures and is more flexible, and also removable and sticks well to magnets. Whether you are printing with PLA, PETG, PEEK, ABS, ASA, TPU or other filaments, this printing platform matches and works well. With this plate, you don't need any tape, glue, or shovel. It's easy to adhere to the printing surface, it's easy to remove the prints, as long as you bend the plate with a little pressure your print will pop out.
3. Better Auto Leveling with CR-touch
CR-touch is Creality's self-developed 16-point automatic bed leveling technology, it is a product developed based on BL-touch and introduced by creality this year. It is claimed that the repeat positioning accuracy <= 0.04, probe detection times up to 100,000 times, so CR-Touch has a higher repeatability and longer life, and may more accurate than the BL-touch. There are some difference is in the sensor; CR-touch uses optical sensor technology to detect the position of the pin inside (BL-touch measures electromagnetic fields), it is more reliable and accurate. 
4. Z-axis Dual-screw+Z-axis Dual-motor
We know that the extruder has a certain weight, especially when the direct drive extruder is mounted on the hot end, its weight will increase and the wear on the toothed belt and bearings will also increase, so more power is needed. And when the printhead moves on the Z-axis, if the weight is not well balanced, the gantry may have a slight tilt and wobble, which may affect the print quality. 
So this time Ender 3 S1 adopts the design of Z-axis double screw + Z-axis double motor, which can effectively solve these problems, Z-axis is more stable and more powerful. When you print, the pulley and timing belt works more smoothly and synchronously, the movement on the Z-axis is more even and smooth, while ensuring the stability of the X-axis when printing, which well reduces the possibility of lines and angles on the ridges when printing, thus improving the print quality.
5. Filament runout sensor
Ender-3 S1 features the functions of detecting filament runout or breakage, and resume after power outage. The filament detection sensor can accurately record the printing data at the time of power outage, filament runout or breakage, it helps to avoid the waste of filaments and time caused by accidents. Although the ender3 V2 also has the function of resume printing after power loss, it does not have the function of filament failure detection. 
Additional Features
-
It has a brand-new 32-bit silent mainboard, which can runs at low decibel levels, greatly reducing noise to let you enjoy your printing.
-
It provides a wide variety of preset interfaces for laser engraving and LED lamps, you can develop more functions on this printer, which is a boon for customers who want more creative possibilities.
-
It features a same size 4.3-inch LCD Screen as Ender 3 V2, but with brand-new UI interface, which is clearer and more user-friendly. Although the screen is not a touch screen, the knob-style operation is not difficult to operate.

-
This time the Ender 3 S1 takes a large SD card, to prevent you from accidentally losing the card because it's too small.

Price & Specs
Retails for $399, Available at 10 a.m. PST on December 1st
Buy on Amazon: Ender 3 S1, $399
Buy on Pergear: Ender 3 S1, $389
Specs:
The properties of Ender 3 S1
| Technology: | FDM |
|---|---|
| Printing size: | 220x220x270mm |
| Machine size: | 487x453x622mm |
| Machine weight: | 9,1 kg |
| Extruder | Extruder Direct Drive |
| Printing Speed: | 150mm/s, recommended 60-100 mm/s |
| Filament: | 1.75mm PLA, TPU, PETG, ASA, SILK, ABS |
| Input : | AC 100-120V AC 200-240V 50/60Hz |
| Output: | DC 24V |
| Total Power: | 350W |
| Layer thickness: | 0.1 mm - 0.4 mm |
| Nozzle diameter: | Standard 0.4mm |
| Precision : | ±0.2 mm |
| Format file: | STL, OBJ, AMF |
| Highest nozzle temperature: | 260℃ |
| Highest printbed temperature: | 100℃ |
| Toolbox: | Yes |
| Printing platform: | PEI magnetic build plate |
| Slicer sofware: | Cura/Simplify 3D/Prusa slicer/Repetier-Host |
| Touch screen: | 4.3 "Color Touch Knob Screen |
| Working mode: | Memory card offline or online printing |
| Resume printing after power failure: | Yes |
| Filament sensor: | Yes |
| Dual Z-axis screws: | Yes |
| Auto bed leveling: | CR touch |
| Language: | English |
| Computer operating system: | Windows XP/Vista/7/10/MAC/Linux |
Assemble
Since a very large part of this printer comes pre-installed, it is extremely easy and simple to assemble, you only need 6 steps to put it together. We started testing this product the day we received it and have been testing it for about a month so far. Following the instructions in the user manual, we went from unboxing to assembly in less than 15 minutes.
And Creality post a unboxing video, you can follow the video to set up this 3d printer. This 4-minute video will give you an idea of how to quickly and successfully assemble this 3d printer.
Unboxing and assemble video:
Test
Test 1: astronaut model
The first test was using the astronaut model on the .
We used red CR-PLA filament to print, and set the hot-end temperature to 200 °C and the bed to 60 °C for the test. We attempt to 3D print the model after loading the Creality Slicer config. This print took about 3 hours to complete the model.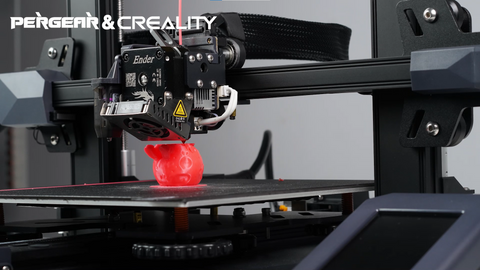
After printing is completed, removing the printed model from the spring steel platform is very easy, with gentle pressure you can move the model, it allows you to remove the model without a spatula, or you can take the spring steel platform down and remove the model.
From the pictures you can observe that this print was very successful, the surface of the model was very smooth, no pulling occurred, you can see the texture of the moon surface in the model, the details are good.
Let's see how the printed model performs by visual observation.
-
Surfaces: The surface and smooth and fine, very little stringing, only part of the connection has small bumps
-
Details: The details are also well handled, with the lunar surface and the astronauts' clothes printed with fine and comforting textures.
-
Consistency: The overall consistency was good, there is no fault phenomenon and no layer pattern.
Ender3 S-1 3D printer showcase:
Test 2: Turtle phone holder
The face of the turtle print was very successful, without a single flaw. However, there is some stringing at the joints of its legs, and some of the edges are not quite flat and need to be sanded with sandpaper.
Apart from the defects in small details, we are generally very satisfied and the consistency of the prints is still very good.
We use this Ender 3 S1 to print small objects, rarely see any errors in the printed items. But when we printed large objects, we tried 2 more times before we were very satisfied with the results.
All in all, we are very satisfied with the print quality of this printer, although its printing speed is not as fast as ender 7, but this way the printer maintains the accuracy and the quality of the print.
Similar Products:
-
Original Prusa I3 MK3S+
If you are looking for the best consumer machine, you want to get the best printing experience and you are on a good budget, then I recommend you this Prusa I3 Mk3S+.
The Prusa machines are our top Top Picks. The Prusa I3 Mk3S+ is compatible with a variety of consumables and can print more durable supplies; print speed can reach 200+mm/s with little noise; supports automatic leveling, and print quality is excellent. Its disadvantage among these similar competitive products may be the price.
-
Anycubic Vyper
If you want to drop features to save some of the Prusa I3 MK3S+’s cost, and don't want to break your bank, you could go with the Anycubic Vyper and Artillery Genius, but for effective savings, you could also just opt for the Ender 3 S1.
The Ender 3 S1 remains our first choice for a budget 3D printer. It has everything you need to get started printing at a low cost, and as you print more and more, you will grow to like it.
-
Artillery Genius Pro
Another option is the Artillery Genius Pro, which has many similar features to the Ender 3 S1, and it also performs well in terms of print quality. But unlike the Ender 3 s1, it has a glass printing platform and a plastic extrusion gear, and we also found that the leveling accuracy was not particularly well during auto-leveling. But if you can live with some of these drawbacks, this printer is a good choice, and it is also worth noting that it is the cheapest of several products.
Here I have made some comparisons of the specification information of these four products for reference.
ANYCUBIC VYPER ARTILLERY GENIUS PRO ORIGINAL PRUSA I3 MK3S + ENDER-3 S1 Structural stability I3, dual Z-axis + V-wheel I3, dual Z-axis + V-wheel I3, dual Z-axis + V-wheel I3, dual Z-axis + V-wheel Extrusion system Titan extrusion Titan extrusion Direct drive Direct drive Nozzle and cooling design 260℃+Dual Fans 260℃+Single Fan 260℃+Single Fan 260℃+Single Fan Print volume 245* 245* 260 220* 220* 250 250* 210* 210 220* 220* 270 PLA, TPU, ABS, PETG ✔ ✔ ✔ ✔ High-temperature filament(nylon /PC) × × ✔ × Printing Platform PEI Spring Steel Carbon silica crystal glass Spring Steel (three types of print surface) PC Spring Steel Automatic leveling ✔ ✔ ✔ ✔ Preheating time & hot bed temperature 5 min to 110℃ 80℃ in less than 2 min 6 min to 110℃ 5 min to 100℃ Print speed mm/s <180 Recommended 80-100mm/s Maximum 150 Maximum 200+ Recommended 120 Maximum ≤200 Recommended 100 Resume print function ✔ ✔ ✔ ✔ Damaged material detection ✔ ✔ ✔ ✔ Power supply Built-in 360W power supply Built-in 450W power supply High quality Delta PSU with power emergency function Built-in 360W power supply Price on Amazon $429 $349 $749 $399 Installation Three-step quick installation 85% pre-installed, 3 minutes Kit + 10 minutes 96% pre-installed + 6-step installation Mrmory cards Large SD card、Micro USB SD card、USB SD card、MIcro USB large SDcard、Type-C US Fan noise 60Dbi 60Dbi ≤45dbi 52Dbi Color Deep Blue Blue Orange Grey
Conclusion:
PROS
-
Excellent print quality
-
Setup and use friendly
-
Good bed leveling
-
Print very quiet
CONS
-
Selecting print jobs is laggy
-
Print speed is not very fast
Verdict:
We tested several colors of Creality PLA filaments on the Ender 3 S1 and the most of results were invariably impressive. And we are also going to use PETG, TPU and more filaments to print in the later test, the test results will be updated after.
So based on our test and print experience, if you ask me if I recommend this product, then my answer is yes. The Ender 3 S1 now becomes our most recommended printer under $400, if you are looking for a low-budget but efficient printer with a direct drive extruder, this one is the best for you.
If you're looking for a first 3D printer in your life, then the Ender 3 S1 is an excellent choice. And I also recommend you to buy ender3 S1 instead of Ender 3 Pro or Ender 3 V2, even if they have a more tempting price, because some features the ender 3 S1 has that are worth investing more in.
If you already have an Ender 3 Pro or Ender 3 v2 and are now considering whether the improvements and additional features of the Ender 3 S1 are worth updating, for me the answer is probably also yes, you will get a better printing experience. However, if you don't want to opt for a newer version, it's worth trying to revamp and upgrade some accessories and features from the original, although it will cost more in terms of time.
What do you think of the new Ender 3 S1? Comment below to let us know.
See review on ender 3 s1 from noveltymaker here
Ender 7 review: https://www.pergear.com/blogs/review/creality-ender-7-hands-on-review


2 comments
Leigh
So far I can’t get a decent print out of Mine. Z axis offset changes after each set up and each print. I was hope full this would be easier than the 3v2 but so far nothing but headaches
Gabriel
So does it have a touch screen or not? In the key features you said touch screen but then you said it has the same screen as the V2.